
MW4 map guide

Rooftops Hardpoint rotations and spawns

Rooftops has six hills. This guide takes them in order: how pros rotate from one to the next, when to leave, where they hold and where you spawn while each one is live. It's built from 66 pro rotations and 97 pro respawns across 14 pro scrim maps on Rooftops.

6hills
66pro rotations
14pro scrim maps
8CDL games to watch
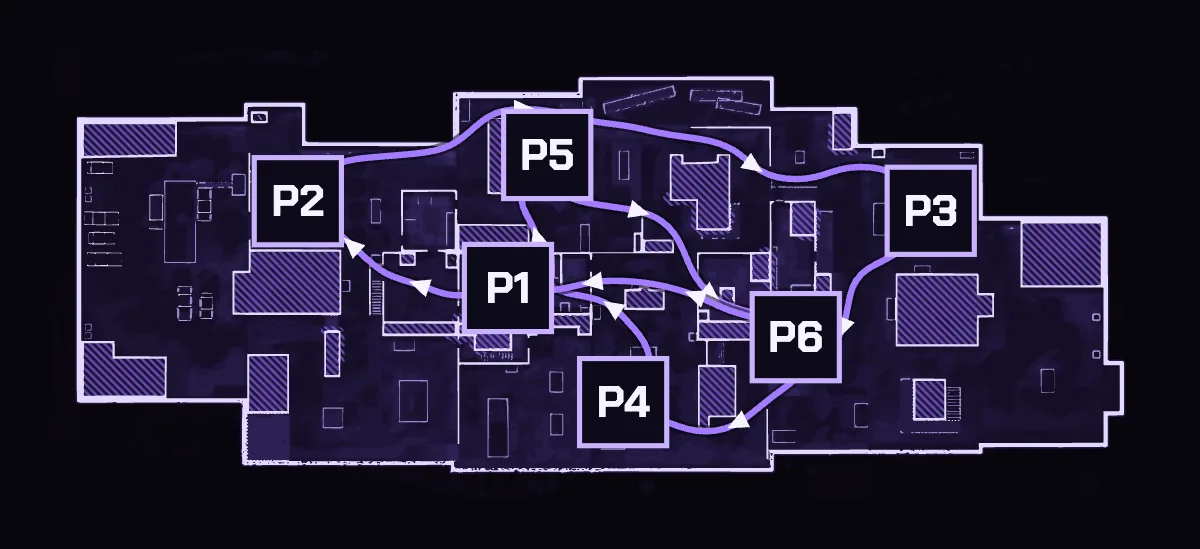
Rooftops map with the six Hardpoint hills labelled: P1 Laundry Room, P2 Fans, P3 Greenhouse, P4 Center, P5 Patio, P6 Pigeon Coop, and the main pro route between them
P1 Laundry Room, P2 Fans, P3 Greenhouse, P4 Center, P5 Patio and P6 Pigeon Coop, with the main pro route between them. Tap the map to open it in the Map Lab.

Hill order

The Rooftops hills go up in this order. After P6 Pigeon Coop the rotation starts again at P1 Laundry Room, so P1 comes round more than once in a long game.

  1. P1Laundry Room
  2. P2Fans
  3. P3Greenhouse
  4. P4Center
  5. P5Patio
  6. P6Pigeon Coop
  7. P1then back to the start

Rotations and when to leave

Run times are at a sprint. The main route is the way pros ran most often, and the alternate is the other way in.

The leave column is when to send your first player off the old hill: the run plus about 10 seconds, rounded to the nearest 5, so they're set before the new hill goes live.

The longest run on Rooftops is P2 to P3 at 16s. The shortest is P1 to P2 at 5.5s.

RotationMain routeAlternateLeave atPro rotations seen
P1 → P2Laundry Room to Fans5.5s7s15s left18
P2 → P3Fans to Greenhouse16s16s25s left16
P3 → P4Greenhouse to Center9.5s9.5s20s left11
P4 → P5Center to Patio8s9s20s left8
P5 → P6Patio to Pigeon Coop8s10.5s20s left7
P6 → P1Pigeon Coop to Laundry Room7s7.5s15s left6

Hill by hill

Each hill as the Map Lab shows it: the route in from the hill before, the spots pros held when they won it and the spawn zones while it's live.

  • Main pro route
  • Alternate
  • Where pros hold
  • Safe spawn
  • Mixed
  • Trap
  • Few seen
ABCSend one with 15s leftABCDP1Laundry RoomP2P3P4P5P6Pigeon Coop
P1 Laundry Room, with the route in from P6, where pros hold and where you spawn.
P1 of 6

Laundry Room

The first hill of the game, and the one you rotate back to from P6 Pigeon Coop

Getting there

The main pro route from P6 Pigeon Coop takes 7s at a sprint, and the alternate takes 7.5s. Send your first player with 15s left on P6. From 6 pro rotations.

Where pros hold

Counted across the 5 P1 hills pros won. A and B are on the hill itself. On the map, a short line from a spot shows where players looked.

  • AOn the hillheld in 5 of 5
  • BOn the hillheld in 5 of 5
  • COff the hillheld in 2 of 5
  • DOff the hillheld in 5 of 5

Where you spawn

While P1 is live you spawn in one of three zones. A is mixed. B and C were seen too few times to judge.

  • AMixed · 6 spawns1 of 6 died in 10s
    first fight about 11s in
  • BFew seen · 5 spawns0 of 3 died in 10s
    first fight about 13s in
  • CFew seen · 3 spawns1 of 3 died in 10s
    first fight about 8s in

Spawns flipped in 3 of 8 P1 hills seen, about 55s in.

Open P1 in the Map Lab
ABCSend one with 15s leftABCDP1Laundry RoomP2FansP3P4P5P6
P2 Fans, with the route in from P1, where pros hold and where you spawn.
P2 of 6

Fans

Rotating in from P1 Laundry Room

Getting there

The main pro route from P1 Laundry Room takes 5.5s at a sprint, and the alternate takes 7s. It is the shortest run on Rooftops. Send your first player with 15s left on P1. From 18 pro rotations.

Where pros hold

Counted across the 10 P2 hills pros won. A is on the hill itself. On the map, a short line from a spot shows where players looked.

  • AOn the hillheld in 10 of 10
  • BOff the hillheld in 7 of 10
  • COff the hillheld in 10 of 10
  • DOff the hillheld in 8 of 10

Where you spawn

While P2 is live you spawn in one of three zones. A is safe. B is mixed. C was seen too few times to judge.

  • ASafe · 7 spawns0 of 6 died in 10s
    first fight about 11s in
  • BMixed · 6 spawns2 of 6 died in 10s
    first fight about 13s in
  • CFew seen · 4 spawns1 of 4 died in 10s
    first fight about 11s in

Spawns flipped in 2 of 8 P2 hills seen, about 31s in.

Open P2 in the Map Lab
ABSend one with 25s leftABCDP1P2FansP3GreenhouseP4P5P6
P3 Greenhouse, with the route in from P2, where pros hold and where you spawn.
P3 of 6

Greenhouse

Rotating in from P2 Fans

Getting there

The main pro route from P2 Fans takes 16s at a sprint, and the alternate takes 16s. It is the longest run on Rooftops. Send your first player with 25s left on P2. From 16 pro rotations.

Where pros hold

Counted across the 8 P3 hills pros won. A is on the hill itself. On the map, a short line from a spot shows where players looked.

  • AOn the hillheld in 8 of 8
  • BOff the hillheld in 7 of 8
  • COff the hillheld in 5 of 8
  • DOff the hillheld in 6 of 8

Where you spawn

While P3 is live you spawn in one of two zones. A is mixed. B is a trap.

  • AMixed · 6 spawns1 of 6 died in 10s
    first fight about 9s in
  • BTrap · 5 spawns3 of 5 died in 10s
    first fight about 9s in

No spawn flips in the 5 P3 hills seen.

Open P3 in the Map Lab
ABCSend one with 20s leftABCDP1P2P3GreenhouseP4CenterP5P6
P4 Center, with the route in from P3, where pros hold and where you spawn.
P4 of 6

Center

Rotating in from P3 Greenhouse

Getting there

The main pro route from P3 Greenhouse takes 9.5s at a sprint, and the alternate takes 9.5s. Send your first player with 20s left on P3. From 11 pro rotations.

Where pros hold

Counted across the 4 P4 hills pros won. B and D are on the hill itself. On the map, a short line from a spot shows where players looked.

  • AOff the hillheld in 4 of 4
  • BOn the hillheld in 4 of 4
  • COff the hillheld in 4 of 4
  • DOn the hillheld in 4 of 4

Where you spawn

While P4 is live you spawn in one of three zones. A is a trap. B and C were seen too few times to judge.

  • ATrap · 7 spawns3 of 7 died in 10s
    first fight about 4s in
  • BFew seen · 4 spawns1 of 4 died in 10s
    first fight about 15s in
  • CFew seen · 3 spawnstoo few to judge

Spawns flipped in 2 of 5 P4 hills seen, about 32s in.

Open P4 in the Map Lab
ASend one with 20s leftABCDP1P2P3P4CenterP5PatioP6
P5 Patio, with the route in from P4, where pros hold and where you spawn.
P5 of 6

Patio

Rotating in from P4 Center

Getting there

The main pro route from P4 Center takes 8s at a sprint, and the alternate takes 9s. Send your first player with 20s left on P4. From 8 pro rotations.

Where pros hold

Counted across the 3 P5 hills pros won. A is on the hill itself. On the map, a short line from a spot shows where players looked.

  • AOn the hillheld in 3 of 3
  • BOff the hillheld in 3 of 3
  • COff the hillheld in 3 of 3
  • DOff the hillheld in 3 of 3

Where you spawn

While P5 is live there is one spawn zone seen. A was seen too few times to judge.

  • AFew seen · 3 spawnstoo few to judge

Spawns flipped in 2 of 3 P5 hills seen, about 28s in. Few respawns were seen on this hill, so treat it as a guide.

Open P5 in the Map Lab
ASend one with 20s leftABCDP1P2P3P4P5PatioP6Pigeon Coop
P6 Pigeon Coop, with the route in from P5, where pros hold and where you spawn.
P6 of 6

Pigeon Coop

Rotating in from P5 Patio

Getting there

The main pro route from P5 Patio takes 8s at a sprint, and the alternate takes 10.5s. Send your first player with 20s left on P5. From 7 pro rotations.

Where pros hold

Counted across the 3 P6 hills pros won. A is on the hill itself. On the map, a short line from a spot shows where players looked.

  • AOn the hillheld in 3 of 3
  • BOff the hillheld in 3 of 3
  • COff the hillheld in 3 of 3
  • DOff the hillheld in 3 of 3

Where you spawn

While P6 is live there is one spawn zone seen. A is safe.

  • ASafe · 5 spawns0 of 5 died in 10s
    first fight about 10s in

No spawn flips in the 4 P6 hills seen. Few respawns were seen on this hill, so treat it as a guide.

Open P6 in the Map Lab

How spawns work on Rooftops

Spawns flipped in 9 of 33 hills on Rooftops, mostly late: about 32s into the hill. Hold your side early and you keep good spawns.

Trap zones on Rooftops: B on P3 and A on P4. Players who spawned there often died within 10 seconds. On P6 every zone with enough spawns to judge came out safe.

Safe means 15% or fewer of the players who spawned in a zone died within 10 seconds. Trap means 40% or more did, and mixed is in between. Few seen means fewer than five spawns, too few to judge.

  • You spawn away from the other team and close to your own.
  • Each hill has two sides. Hold your side and your spawns stay behind you.
  • Push too far past the hill and the spawns flip: they spawn behind you.
  • When the hill moves, both teams’ spawns move with it.
Search and Destroy

SnD numbers on Rooftops

From 72 pro SnD rounds on Rooftops.

71%of rounds go to the team that gets first blood (51 of 72)
20smedian time to the first death
36%of first deaths are traded within 4 seconds
40%of rounds see the bomb go down, at a median 35s in
45%of planted rounds are won by the planting side (13 of 29)
A 11 · B 18plants on each site

The side up a player

How often the team with more players alive wins the round, from 283 pro rounds on all maps.

  • 4v368%
  • 4v285%
  • 4v198%
  • 3v281%
  • 3v197%
  • 2v191%

Clutches

How often the last player alive wins it. Use the time and the bomb.

  • 1v210%
  • 1v33%
  • 1v42%
Plan a Rooftops round in the Map Lab
ABomb site ABBomb site B
Bomb sites A and B on Rooftops.

Where the numbers come from

Rotations, run times, holds and spawns on this page come from 14 pro scrim maps on Rooftops: 66 pro rotations and 97 pro respawns. Hills with only a few rotations or spawns seen say so.

The SnD numbers come from 72 pro rounds on Rooftops, and the advantage and clutch tables from 283 pro rounds on all maps. The pro games are from the CDL Launch Invitational broadcast.

The same numbers drive the free Map Lab, where you can draw your own plan on Rooftops, save it and send it to your team. Updated 7 November 2026.

Want this for your own team?

A Team Review puts your own rotations, rounds and spawns next to these pro numbers, map by map, with the five changes that matter most.